Introduction to Automatic Irrigation System Installation
In modern agriculture and landscape management, the efficient use of water is of vital importance for both economic profitability and environmental sustainability. While traditional irrigation methods cause water waste, plant diseases, and high labor costs, automatic irrigation systems solve these problems fundamentally. An automatic irrigation system ensures that water is delivered to the plant root zone in pre-determined time intervals and quantities without the need for human intervention.
The smart irrigation technologies we have developed as Esular take this process one step further, allowing you to irrigate not just based on timing, but according to the actual needs of the soil. In this guide, we will cover all the technical details of an automatic irrigation system installation in the finest detail, from the planning stage to sensor integration. Whether it is a small hobby garden or thousands of decares of agricultural land, the correct installation principles remain the same.
Pre-Installation Planning and Design Stages
The foundation of a successful installation is a detailed project design carried out before going into the field. Pipes laid without planning can lead to pressure losses and plants being left without water in the future. The following critical steps should be followed when preparing an irrigation project:
1. Water Source and Pressure Analysis
The heart of the system is the water source. It could be supplied from mains water, well water, or a tank. The 'Dynamic Pressure' required for the system to operate must be measured. If the pressure is insufficient, a pump or booster system may need to be added. Solutions such as the Esular F Series Pump Control System can be preferred for pump control to ensure energy savings.
2. Zoning
The water needs of each plant group are different. Turf areas, shrub groups, and trees should be separated into different zones. Additionally, the flow rate of the water source may not be sufficient to irrigate the entire area at the same time. In this case, the area is divided into 'zones' and each zone is irrigated sequentially. When zoning, the duration of sun exposure and soil structure should also be taken into account.
3. Pipeline and Valve Placement
The route of the main line and lateral lines should be determined. Pipe diameters should be calculated according to the flow rate. Solenoid valves, which will execute the commands coming from the irrigation timer or control unit, should be placed in an easily accessible valve box.
Required Materials and Technology Selection
The use of high-quality materials ensures the system operates trouble-free for many years. The basic material list for an automatic system is as follows:
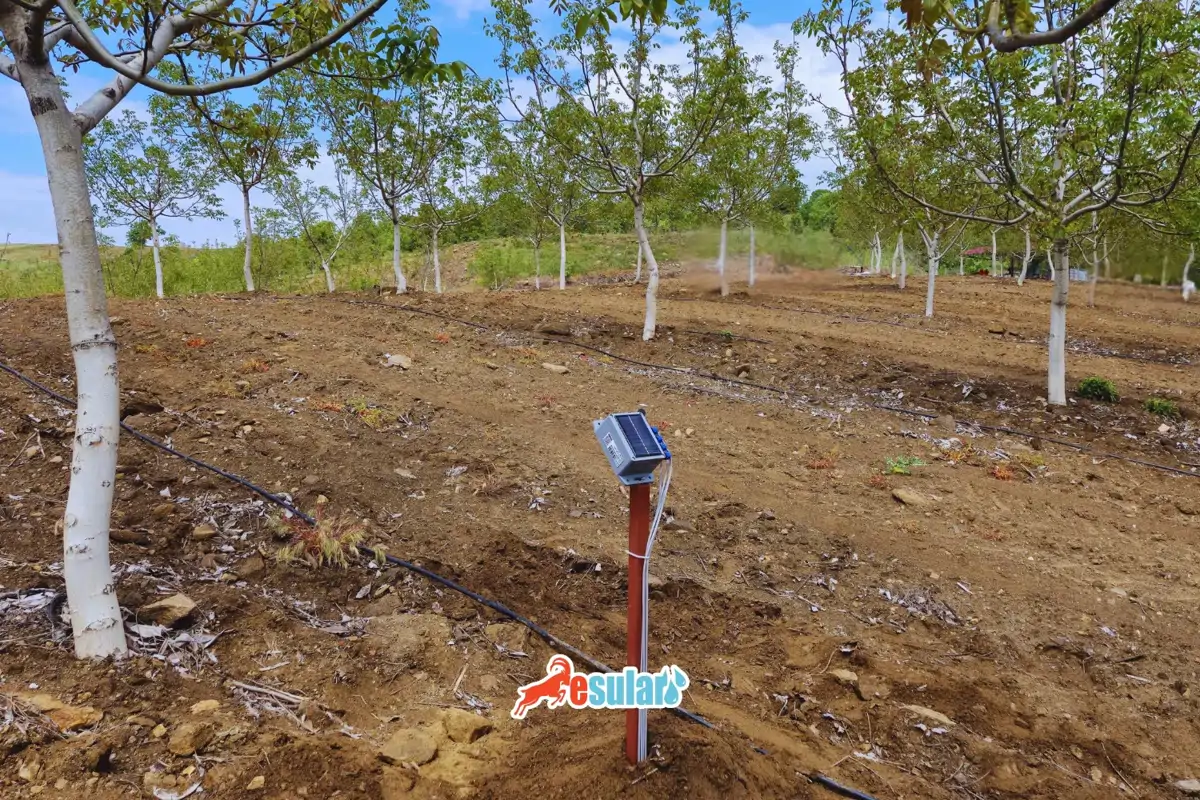
In smart farming applications, wireless solutions are of vital importance, especially in large areas, to prevent cable clutter and malfunctions. The LoRa-based systems offered by Esular allow you to control valves from distances of kilometers.
Step-by-Step Automatic Irrigation System Installation
After planning is finished and materials are procured, the physical installation stage begins. At this stage, meticulousness is essential for leak-tightness and system stability.
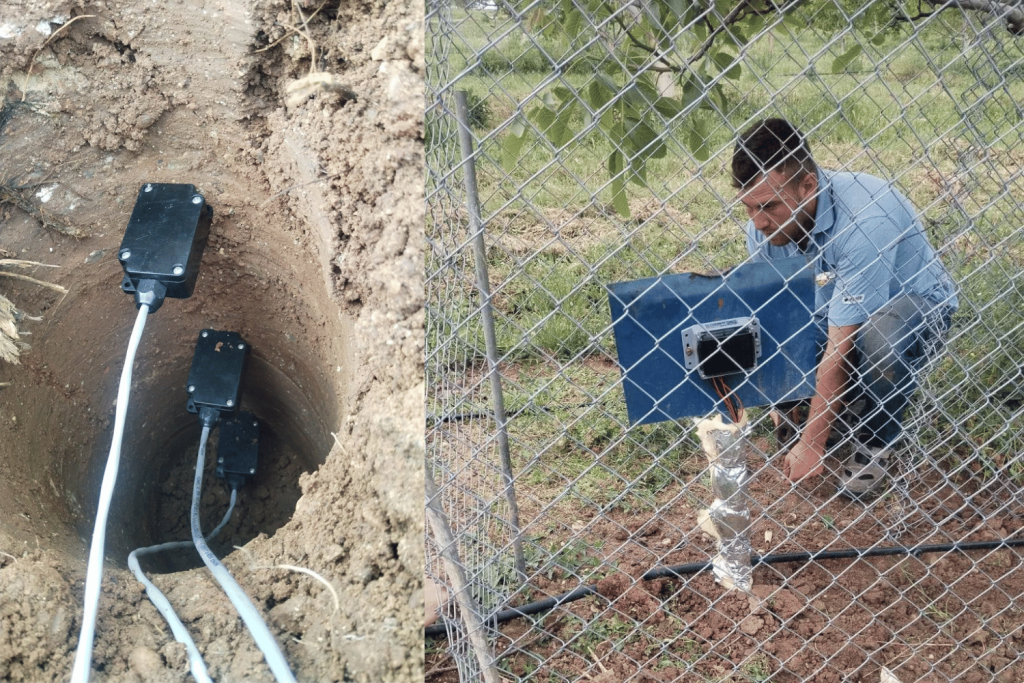
Step 1: Excavation Works
Trenches should be opened along the routes where the pipelines will pass. The depth should generally be between 30-50 cm to protect the pipes from the risk of freezing and physical impacts. Care should be taken not to damage existing infrastructure installations (electricity, water, internet) during excavation.
Step 2: Laying the Main Line
The main line from the water source to the valve box is laid. It should be remembered that this line will be under constant pressure; therefore, high-strength (PN10 or PN16) PE pipes should be used. Teflon tape or appropriate gasketed fittings should be used at pipe joints for sealing.
Step 3: Valve Box and Solenoid Valve Installation
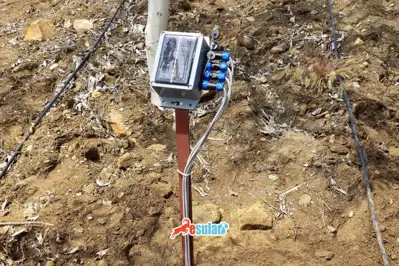
Solenoid valves are mounted on a manifold according to the number of zones. Attention should be paid to the inlet and outlet directions (arrow mark) of the valves. If you are setting up a wireless system, the Esular Valve Control Unit is placed inside or near the valve box. This unit opens and closes the valve by receiving signals from the central station.

Important Note: Electrical connections of solenoid valves must be made with waterproof connectors. Otherwise, short circuits may occur due to moisture. 12V DC Latching valves are the most ideal choice for energy savings.
Step 4: Lateral Lines and Installation of Irrigation Heads
The lines after the valves (lateral lines) are laid. Sprinkler heads or drip irrigation pipes are connected to the ends of these lines. If drip irrigation is preferred, a filter must be used to prevent particles inside the pipes from clogging the drippers. For detailed information about filter selection, you can review our article on filters in drip irrigation.
Smart Irrigation and Sensor Integration
A system connected only to a timer might irrigate even while it is raining. This situation causes both water waste and rotting of plant roots. Sensor integration is essential for a true smart irrigation system.
Soil Moisture Sensor Installation
Soil moisture sensor is placed at the root depth of the plant and measures the amount of water in the soil in real-time. Esular's wireless sensors send this data to our cloud-based software. If the soil is sufficiently moist, the system automatically cancels or postpones the planned irrigation. In this way, water savings of up to 40% are achieved.
Weather Station Connection
Air temperature, wind speed, and evaporation (evapotranspiration) data are used to optimize the irrigation amount. Agricultural weather stations can be integrated into your system, allowing you to perform prediction-based irrigation. For example, during hours when the wind is very strong, the system may stop working because sprinkler irrigation would cause water to be scattered.
System Programming and Irrigation Timer Settings
After the installation is complete, the system programming stage begins. Esular users can easily make all these settings via their smartphones or computers.
Tips for Ideal Programming:
- Irrigation Time: Early morning hours (05:00 - 08:00) when evaporation is at its minimum should be preferred.
- Zone Durations: While 15-20 minutes is usually sufficient for turf areas, this period can go up to 1-2 hours for trees with drip irrigation.
- Cycle Irrigation: The irrigation duration can be divided into two to allow the soil to absorb the water (e.g., 10 minutes of irrigation, 30 minutes of waiting, 10 minutes of irrigation again).
- Sensor Thresholds: Irrigation should be set to start when soil moisture falls below the critical level (e.g., 20%).
Esular's cloud-based irrigation management software analyzes past irrigation data and suggests the most suitable program for you. Additionally, you can learn in detail how to install Smart Garden series devices via our water timer guide.
Maintenance and Winter Preparation: Extend the Life of the System
Automatic irrigation systems can provide trouble-free service for 15-20 years when regular maintenance is performed. Maintenance processes should include the following headings:
- Filter Cleaning: Filters should be checked at the beginning and end of the season, and accumulated sediments should be cleaned.
- Nozzle Control: Clogged sprinkler heads or drippers should be cleaned or replaced.
- Leak Tracking: Possible leaks in the pipelines should be tracked through sudden increases in the water bill or via flow sensors.
- Winter Preparation: In regions with a risk of freezing, the water in the system should be completely drained, and control units should be turned off.
Why Should You Choose Esular Smart Irrigation Systems?
Esular is not just an equipment manufacturer, but a full-service technology partner. Our systems, developed with Turkish engineering, offer world-class performance. The Esular smart irrigation solution provides users with the following advantages:
- Wireless Technology: Get rid of cable costs and malfunctions with LoRa technology.
- Mobile Control: Irrigate your field or garden from your pocket, wherever you are in the world.
- Precision Sensors: Perform pinpoint irrigation with sensors that listen to the voice of the soil and the air.
- Energy Efficiency: Set up automation even in places without electrical infrastructure with our solar-powered and battery-operated devices.
To see our installation processes more closely, you can watch the training videos on our YouTube channel. The installation videos we prepared with our expert team will facilitate your work by visualizing the technical details.
Frequently Asked Questions
What is the cost of an automatic irrigation system? The cost varies according to the size of the area, the number of valves to be used, and the sensor technology. For a detailed analysis, you can take a look at our cost guide or get a price quote from us.
Can I convert my existing manual system to automatic? Yes, you can easily make your system automatic by adding solenoid valves and a control unit to your existing pipeline. Esular's wireless units are the most practical solution for this conversion.
Will irrigation stop if the internet is disconnected? No. Esular control units keep the programs in their memory. Even if the internet is disconnected, the devices continue to implement the pre-defined programs. When the internet returns, it synchronizes the data to the cloud.
Conclusion
Automatic irrigation system installation creates a revolution in agricultural production when combined with correct planning and technology. In today's world where water resources are rapidly being depleted, accounting for every drop is not just a preference, but a necessity. As Esular, we continue to offer the most advanced technology with the easiest user experience to our farmers and landscape professionals.
If you also want to equip your land with the technology of the future and increase your yield while ensuring water and energy savings, you can trust Esular's expertise. We are with you at every stage, from step-by-step installation to professional project design.
Next Steps
For more information and professional support:
- Explore our products: Esular Product Catalog
- Examine our projects: Esular Success Stories
- Contact us: Get Free Consultancy
Don't forget to subscribe to our blog newsletter and follow us on our social media accounts to not miss the latest developments in agricultural technologies!